作者:hh呢喃_845 | 来源:互联网 | 2023-08-31 13:35
篇首语:本文由编程笔记#小编为大家整理,主要介绍了androidframework系统源码分析之dumpsys原理分析-千里马带你学framework相关的知识,希望对你有一定的参考价值。
篇首语:本文由编程笔记#小编为大家整理,主要介绍了android framework系统源码分析之dumpsys原理分析-千里马带你学framework相关的知识,希望对你有一定的参考价值。
背景:
hi,粉丝朋友们大家好!
我们学习android framework实战开发过程中经常会用到一些辅助的shell命令,比如最经典就是我们常见的dumpsys啦,还记我给大家讲解的入门课,实战课,跨进程专题课其实都用用到这个命令;当时我只是给大家讲解怎么使用这种dumpsys一些命令,并没有给大家讲解它的一个原理,但是对于对android系统充满好奇小伙伴们,肯定不满足与简单使用,还是想搞明白他到到底什么原理,那么搞懂它到底有什么好处么?那当然是好处多多,我这里给大家主要罗列一下几点:
1、分析出dumpsys实现原理,可以知道他是怎么实现的整套系统各个调试运作,方便我们以后自己取实现新调试系统的参考
2、可以分析dumpsys架构源码,推断出要dump某个类信息时候是使用哪个命令,而不是现在的完全靠经验记住几个常用dumpsys命令
3、在自己开发模块过程中也可以自己借助dump来多打印一些自己的调试信息
。。。。
好了大概有以上几点的好处,其他不一一列举,我相信以上3点就对大家非常非常有用了,毕竟你已经和不懂dumpsys的小伙伴已经差距拉开了,好了下面开始我们的分析dumpsys之旅。
入门课,实战课,跨进程专题
ps需要学习深入framework课程和课程优惠
(可以加我qq:2102309716 优惠购买)
1 首先来看看dumpsys这里命令源码在哪里?
路径:frameworks/native/cmds/dumpsys/
里面有如下几个文件:
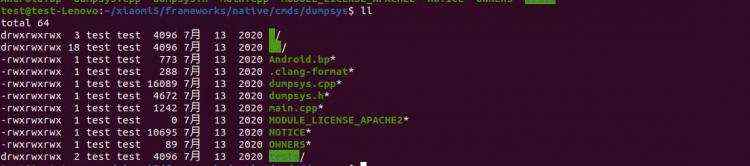
这里其实核心就是dumpsys.cpp
#include
#include
#include
#include
#include
#include
#include
#include
#include
#include
#include
#include
#include
#include
#include
#include
#include
#include
#include
#include
#include
#include
#include
#include "dumpsys.h"
using namespace android;
using ::android::base::StringAppendF;
using ::android::base::StringPrintf;
using ::android::base::unique_fd;
using ::android::base::WriteFully;
using ::android::base::WriteStringToFd;
int Dumpsys::main(int argc, char* const argv[])
Vector<String16> services;
Vector<String16> args;
String16 priorityType;
Vector<String16> skippedServices;
Vector<String16> protoServices;
bool showListOnly &#61; false;
bool skipServices &#61; false;
bool asProto &#61; false;
int timeoutArgMs &#61; 10000;
int priorityFlags &#61; IServiceManager::DUMP_FLAG_PRIORITY_ALL;
static struct option longOptions[] &#61; "priority", required_argument, 0, 0,
"proto", no_argument, 0, 0,
"skip", no_argument, 0, 0,
"help", no_argument, 0, 0,
0, 0, 0, 0;
optind &#61; 1;
while (1)
for (size_t i &#61; 0; i < N; i&#43;&#43;)
const String16& serviceName &#61; services[i];
if (IsSkipped(skippedServices, serviceName)) continue;
if (startDumpThread(serviceName, args) &#61;&#61; OK)
return 0;
可以看到dumpsys会根据传递来的参数调用startDumpThread(serviceName, args)方法&#xff0c;这里serviceName就是我们跨进程中有讲到的ServiceManager中的serviceName&#xff0c;这里核心其实也就是
startDumpThread方法&#xff1a;
status_t Dumpsys::startDumpThread(const String16& serviceName, const Vector<String16>& args)
sp<IBinder> service &#61; sm_->checkService(serviceName);
if (service &#61;&#61; nullptr)
aerr << "Can&#39;t find service: " << serviceName << endl;
return NAME_NOT_FOUND;
int sfd[2];
if (pipe(sfd) !&#61; 0)
aerr << "Failed to create pipe to dump service info for " << serviceName << ": "
<< strerror(errno) << endl;
return -errno;
redirectFd_ &#61; unique_fd(sfd[0]);
unique_fd remote_end(sfd[1]);
sfd[0] &#61; sfd[1] &#61; -1;
activeThread_ &#61; std::thread([&#61;, remote_endstd::move(remote_end)]() mutable
int err &#61; service->dump(remote_end.get(), args);
remote_end.reset();
if (err !&#61; 0)
aerr << "Error dumping service info: (" << strerror(err) << ") "
<< serviceName << endl;
);
return OK;
这里其实就干了2件事&#xff1a;
1、ServiceManager获取到对应的IBinder代理&#xff0c;这里其实跨进程里面也有讲解大家都知道
2、然后调用IBinder对应的dump方法&#xff0c;这里dump方法就会调用到我们对应service的dump&#xff0c;比如dumpsys activity就会调用到ActivityManagerSerivice的dump方法&#xff0c;但是为什么呢&#xff1f;凭啥调用一下IBinder native层面的dump就会调用到Java层面的dump&#xff0c;如果是C&#43;&#43;层面的我们都还可以理解&#xff0c;这直接就到Java层面那就有点难理解了&#xff0c;那么我们就来看看
dumpsys发起binder调用时候&#xff0c;它实际是BpBinder的角色&#xff0c;即客户端&#xff0c;它调用dump&#xff0c;看看BpBinder的dump实现&#xff1a;
// 路径&#xff1a;frameworks/native/libs/binder/BpBinder.cpp
status_t BpBinder::dump(int fd, const Vector<String16>& args)

    Parcel send;
    Parcel reply;
    send.writeFileDescriptor(fd);
    const size_t numArgs &#61; args.size();
    send.writeInt32(numArgs);
    for (size_t i &#61; 0; i < numArgs; i&#43;&#43;)
        send.writeString16(args[i]);

    status_t err &#61; transact(DUMP_TRANSACTION, send, &reply);
    return err;
这里可以看到其实他是transact了code为DUMP_TRANSACTION的数据&#xff0c;到此dumpsys作为客户端就已经非常清楚了&#xff0c;本质就是通过binder给服务段发送了一个code为DUMP_TRANSACTION的数据。
接下来看服务端接受部分&#xff1a;
在跨进程通讯就讲解过&#xff0c;Java中的Binder对象实现其实在底层也有一个类似的BBinder对象&#xff0c;他就是我们的JavaBBinder类&#xff1a;
//路径&#xff1a;frameworks/base/core/jni/android_util_Binder.cpp
class JavaBBinder : public BBinder
public:
status_t onTransact(
uint32_t code, const Parcel& data, Parcel* reply, uint32_t flags &#61; 0) override
jboolean res &#61; env->CallBooleanMethod(mObject, gBinderOffsets.mExecTransact,
code, reinterpret_cast<jlong>(&data), reinterpret_cast<jlong>(reply), flags);
status_t dump(int fd, const Vector<String16>& args) override
return 0;
private:
JavaVM* const mVM;
jobject const mObject;
mutable std::once_flag mPopulateDescriptor;
mutable String16 mDescriptor;
;
所以这里其实binder驱动传递数据后后就是会到这个native的JavaBBinder类里面的onTransact方法&#xff0c;这个方法就完全没有什么自己业务&#xff0c;就是立即jni调用到了Java层面的onTransact&#xff1a;
frameworks/base/core/java/android/os/Binder.java
protected boolean onTransact(int code, &#64;NonNull Parcel data, &#64;Nullable Parcel reply,
int flags) throws RemoteException
if (code &#61;&#61; INTERFACE_TRANSACTION)
else if (code &#61;&#61; DUMP_TRANSACTION)
ParcelFileDescriptor fd &#61; data.readFileDescriptor();
String[] args &#61; data.readStringArray();
if (fd !&#61; null)
try
dump(fd.getFileDescriptor(), args);
finally
IoUtils.closeQuietly(fd);
if (reply !&#61; null)
reply.writeNoException();
else
StrictMode.clearGatheredViolations();
return true;
else if (code &#61;&#61; SHELL_COMMAND_TRANSACTION)
return false;
这里就可以看出来Java层面的onTransact里面会调用到dump方法&#xff0c;到此我们就清楚了dumpsys的dump怎么一步步调用到我们的Java层面的dump&#xff0c;这里我们以AMS为例子来看看dump方法&#xff1a;
//路径frameworks/base/services/core/java/com/android/server/am/ActivityManagerService.java
&#64;Override
protected void dump(FileDescriptor fd, PrintWriter pw, String[] args)
PriorityDump.dump(mPriorityDumper, fd, pw, args);
好了那最后总结一下把&#xff0c;给大家画一幅图方便记忆&#xff1a;

csdn在线学习课程&#xff0c;课程咨询答疑和新课信息&#xff1a;QQ交流群&#xff1a;422901085进行课程讨论
android跨进程通信实战视频课程&#xff08;加群获取优惠&#xff09;


 京公网安备 11010802041100号